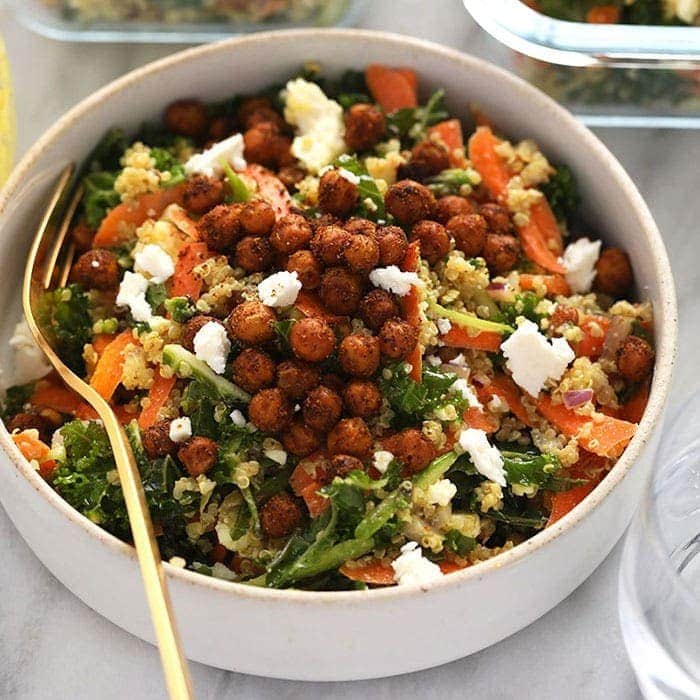
The Undeniable Magic of Crispy Chickpeas: Elevating Your Quinoa Salad
There's a universally acknowledged truth among food lovers: texture is king. While a vibrant, flavorful quinoa salad is a delight in itself, the addition of something truly crunchy can transform it from good to absolutely unforgettable. Enter crispy chickpeas – tiny flavor bombs that provide that much-needed textural contrast, a satisfying pop, and a boost of plant-based protein. When expertly prepared, these golden nuggets are the secret weapon, especially in a Moroccan quinoa salad with crispy chickpeas, where their earthy crunch perfectly complements the aromatic spices and fresh components. However, many home cooks often find themselves in a crispy chickpea conundrum. Instead of light, airy, and crunchy, they end up with chewy, soft, or even burnt results. If you've been yearning for that perfect crispiness to complete your ultimate Moroccan quinoa salad, you've come to the right place. We're about to unveil the definitive secrets, tips, and techniques that will ensure your chickpeas achieve peak crunch factor every single time, making your Your Go-To Moroccan Quinoa Salad & Crispy Chickpeas truly spectacular.Foundation for Flawless Crispiness: Prepping Your Chickpeas
The journey to perfectly crispy chickpeas begins long before they even touch a hot pan or oven. Proper preparation is the single most critical step, and skimping here is the most common reason for failure.Choosing Your Chickpeas: Canned vs. Dried
While you can cook dried chickpeas from scratch, for speed and convenience when aiming for crispy results, canned chickpeas are generally preferred. They are pre-cooked and ready to go, saving you hours of soaking and boiling. When selecting canned chickpeas, opt for those with minimal added sodium if possible, or simply rinse them very thoroughly.
The Golden Rule: Rinse and Dry, Dry, Dry!
This cannot be stressed enough: chickpeas must be absolutely, unequivocally bone dry before cooking. Any residual moisture will steam them instead of allowing them to crisp up, leading to a chewy, rather than crunchy, texture.
- Rinsing: Drain your canned chickpeas and rinse them thoroughly under cold running water. This removes the starchy liquid (aquafaba) and any excess sodium.
- Pat Dry: Spread the rinsed chickpeas in a single layer on several sheets of paper towels or a clean kitchen towel. Gently pat them dry, pressing firmly to absorb as much moisture as possible.
- Air Dry (Optional, but Recommended): For an even crispier result, let the patted-dry chickpeas air dry for an additional 15-30 minutes, or even up to an hour. You can leave them on the counter or, if you have a very low oven setting, a few minutes at 200°F (95°C) can help evaporate any stubborn moisture.
- Removing Skins: For the ultimate crispiness, gently rub the chickpeas between two towels or your hands. The thin skins will loosen and come off. While this step is optional, removing the skins allows the chickpeas to crisp up more uniformly and creates a lighter texture. Discard the skins.
Once you believe your chickpeas are dry, pat them again. Seriously. They need to be *that* dry!
Mastering the Method: Oven Roasting vs. Air Frying
There are a few reliable ways to achieve crispy chickpeas, each with its own advantages. The choice often comes down to your preferred equipment and desired level of hands-on involvement.Oven Roasting: The Classic and Reliable Approach
Oven roasting is perhaps the most common and consistent method for achieving beautifully crispy chickpeas. It’s also excellent for larger batches.
- Preheat High: Preheat your oven to a robust 400-425°F (200-220°C). High heat is essential for drawing out moisture quickly and promoting browning.
- Lightly Oil: In a bowl, toss the dried chickpeas with a tablespoon or two of a neutral high-heat oil like avocado oil or light olive oil. The key is to coat them lightly, not drench them.
- Single Layer: Spread the oiled chickpeas in a single layer on a baking sheet. Do not overcrowd the pan. If they are piled on top of each other, they will steam instead of roast. Use two pans if necessary. Lining with parchment paper can aid in preventing sticking and easy cleanup.
- Roast and Stir: Roast for 20-40 minutes, depending on your oven and desired crispiness. Stir or shake the pan every 10-15 minutes to ensure even browning and crisping. They should look golden brown and feel firm.
- Cooling: For maximum crispness, allow them to cool on the baking sheet for 5-10 minutes after removing them from the oven. They will continue to crisp up as they cool.
Air Frying: The Speedy and Efficient Option
If you own an air fryer, it can be your best friend for making crispy chickpeas quickly and often with less oil.
- Preheat and Oil: Preheat your air fryer to 375-400°F (190-200°C). Lightly toss the dried chickpeas with oil, just like for oven roasting.
- Single Layer in Basket: Place the chickpeas in a single layer in the air fryer basket. Work in batches if necessary to avoid overcrowding.
- Air Fry and Shake: Air fry for 12-18 minutes, shaking the basket vigorously every 4-5 minutes to ensure even cooking and crisping. Keep an eye on them, as air fryers can cook quickly.
- Cool: As with oven roasting, let them cool slightly to enhance their crunch.
A Note on Pan-Frying (Less Common for Large Batches)
While possible, pan-frying is generally best for smaller batches and requires more oil and constant attention. Heat a tablespoon of oil in a skillet over medium-high heat. Add dried chickpeas in a single layer and cook, stirring frequently, until golden and crispy (about 10-15 minutes). This method is less ideal for achieving the uniform crispiness and dry texture needed for a salad topping.
Flavor Fusion: Seasoning Your Crispy Chickpeas for a Moroccan Quinoa Salad
This is where your crispy chickpeas transition from merely crunchy to truly spectacular, especially when destined for a Moroccan quinoa salad. The spices you choose will infuse them with warmth, depth, and the characteristic flavors of Moroccan cuisine.When to Season: The Timing Trick
There's a subtle art to seasoning crispy chickpeas. Adding all the spices too early, especially delicate ones, can lead to burning and bitterness. Salt, specifically, can draw out moisture, so some chefs prefer to add it after roasting for maximum crispiness, or at least during the last few minutes.
- Before Roasting (with oil): Toss your dried, oiled chickpeas with robust, heat-tolerant spices like cumin, coriander, and paprika. This allows the flavors to meld and toast onto the chickpeas.
- After Roasting: Once the chickpeas are crispy and out of the oven/air fryer, immediately toss them with more delicate spices or herbs, like a pinch of cinnamon, cayenne pepper (if you want heat), dried mint, or a final dusting of salt. The residual heat will help the spices adhere without burning.
Moroccan-Inspired Spice Blends
For a Moroccan quinoa salad with crispy chickpeas, think aromatic, earthy, and slightly sweet/spicy. Here’s a fantastic blend:
- Essentials: 1 tsp ground cumin, 1 tsp ground coriander, 1 tsp sweet or smoked paprika.
- Warmth & Depth: 1/2 tsp ground turmeric, a tiny pinch (1/8 tsp) ground cinnamon.
- Heat (Optional): 1/4 - 1/2 tsp cayenne pepper or chili flakes.
- Herbs (Add after roasting): 1 tsp dried mint or parsley (add after roasting to prevent burning).
- Salt & Pepper: To taste, added at the end for best flavor and crispiness.
Mix these spices in a small bowl. After lightly coating your chickpeas with oil, toss them with about half of this spice blend before roasting. Once roasted and crispy, toss them with the remaining spice blend and salt to taste, ensuring every chickpea is a flavorful burst.
Integrating Crispy Chickpeas into Your Moroccan Quinoa Salad
Now that you've mastered the art of crispy chickpeas, it's time to bring them into their natural habitat: a vibrant Moroccan quinoa salad. Their role is multifaceted: they add a crucial textural counterpoint, a protein punch, and absorb those beautiful Moroccan spices, making every bite an adventure. The combination of fluffy quinoa, fresh vegetables, zesty lemon dressing, and those utterly irresistible crispy chickpeas creates a harmonious and satisfying meal that epitomizes a healthy and delicious Why Moroccan Quinoa Salad with Crispy Chickpeas Is Your New Favorite.Tips for Assembly:
- Add Just Before Serving: This is critical for maintaining their crispiness. If you add them too early, they will absorb moisture from the salad dressing and become soft.
- As a Topping: Sprinkle them generously over individual servings of your Moroccan quinoa salad. This ensures everyone gets that satisfying crunch.
- Mix-In: If you're serving the entire salad immediately, you can gently fold them into the salad for a more integrated experience.
- Pairing: The robust flavors of your Moroccan-spiced crispy chickpeas will shine alongside elements like cooked quinoa, diced cucumbers, tomatoes, red onion, bell peppers, fresh parsley, mint, and a zesty lemon-tahini or simple olive oil dressing.
